Chrysanthemum White Bean Paste Nerikiri Cake


This lovely chrysanthemum flower is actually an edible treat!  It’s a Japanese sweet treat known as nerikiri and is simply made with white bean paste.  We’ve previously made a super cute Easter Bunny nerikiri with white bean paste and it was super fun as well as delicious.  
We’ve made a Chrysanthemum White Bean Paste Nerikiri Cake this time in the same way, just in time for the Mid Autumn Festival 中秋節.  Chrysanthemums bloom in the fall and are traditionally used as a background to gleaming mooncakes and flowered filled osmanthus jellies that celebrate the festival.   Today the chrysanthemum leads the way as a delicate, gorgeous to look at and yummilicious to eat treat. What a revelation!
First thing is to make you white bean paste dough.  It’s quite amazing how this whole art form has sprung from such a humble thing as white bean paste.  The correct making of the white bean paste is key to the whole making.  It must be smooth and dry enough to make and hold the shapes.  Please see our post on how to make your own White Bean Paste Nerikiri Dough to find the right way to make it.

Nerikiri,Flower,japanese,wagashi,Chrysanthemum,cake,White Bean Paste

Start by measuring out the white bean paste dough into portions as instructed in the recipe.  By measuring the dough you will end up with equal sized nerikiris.  

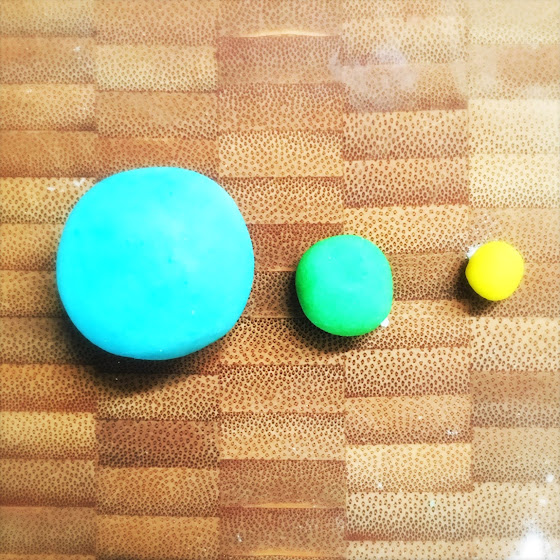
Take the measured portion for the inside layer of wrapping and separate into three sizes.  Use food color gel to color the portions light blue, light green and yellow.  Don’t use regular food coloring as those contain quite a bit of liquid which will make your dough sticky and very hard to work with.

Actually, I found that stickiness is the main issue to deal with while making these nerikiri.  The dough has to be cooked quite dry and that is super important.  Learn the tricks to this in our post about homemade white bean paste dough. But also I found that the kneading of color into the dough introduced heat from your hand into the dough and made it kinda sticky.  There’s an easy fix for this however, just wrap with cling wrap and chill the dough anytime you find it getting sticky.
Nerikiri,Flower,japanese,wagashi,Chrysanthemum,cake,White Bean Paste

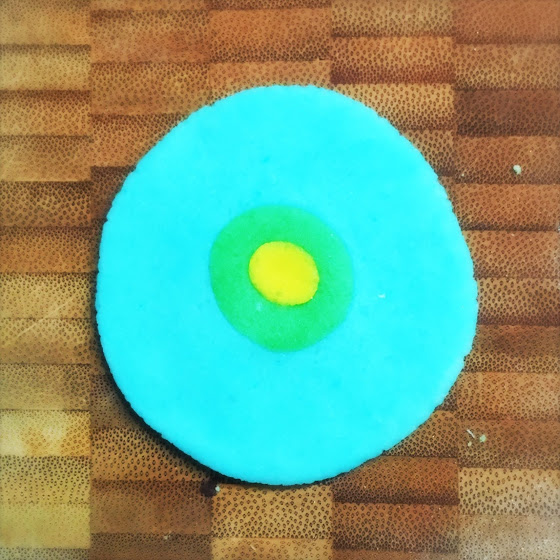
Once your dough is colored and chilled you can put the colors together and the inside layer of wrapping is done.  Looks quite like a dartboard, no?  The yellow is the center of the flower and the green and blue the petals, as you will see as we go along.  You can, of course, switch up the colors however you like.

Nerikiri,Flower,japanese,wagashi,Chrysanthemum,cake,White Bean Paste

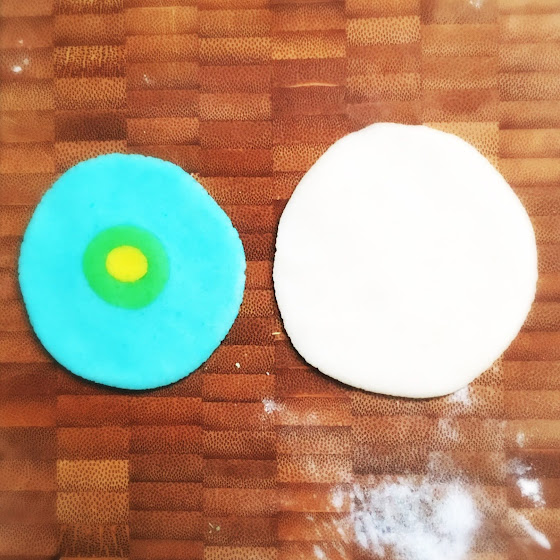
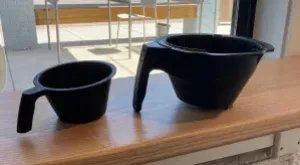
Now we make the outer layer of wrapping, which is the white dough on the right in the photo above.  This is just white bean paste dough rolled out to a slight larger circle than the inside layer of wrapping.  This is so that the white outer layer can completely cover the inside layer later.

Nerikiri,Flower,japanese,wagashi,Chrysanthemum,cake,White Bean Paste

Be sure at this point NOT to do what I did wrong so many times.  You have to put the inside layer and the outside layer together now, however, I kept putting the layers together wrong!!  Arghh~!  

What the heck went wrong?  It’s an easy step right?  Well, I placed the colored dough with pattern facing up.  WRONG!  You have to flip over so that the patterned side faces the white  dough.  You don’t want to see the pattern!  It will show up later as long as you have it flipped away from sight now.

Nerikiri,Flower,japanese,wagashi,Chrysanthemum,cake,White Bean Paste
Outer wrapping is done!  Now we weight out and add the filling.  For the filling we just used plain white bean paste but you can use red bean paste, or whatever you fancy.  Just be sure to chill to weigh, roll and chill the filling paste balls beforehand so as to firm it up and decrease any stickiness.

Nerikiri,Flower,japanese,wagashi,Chrysanthemum,cake,White Bean Paste

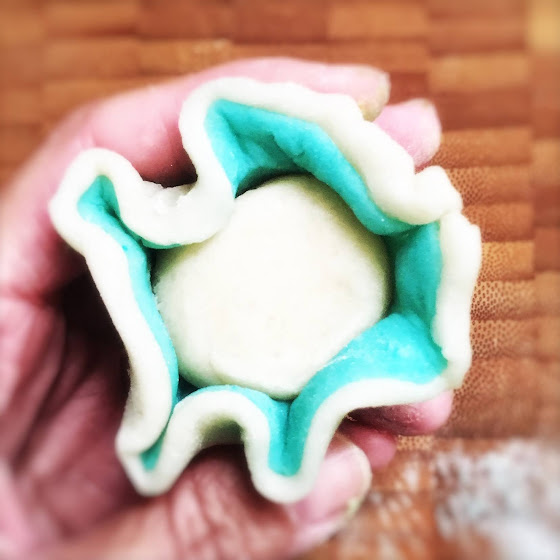
Here we show the wrapping of the white bean paste dough wrapping around the filling.  You see how the slightly larger white bean paste dough outer layer will allow you to close up the Nerikiri cleanly.

Nerikiri,Flower,japanese,wagashi,Chrysanthemum,cake,White Bean Paste

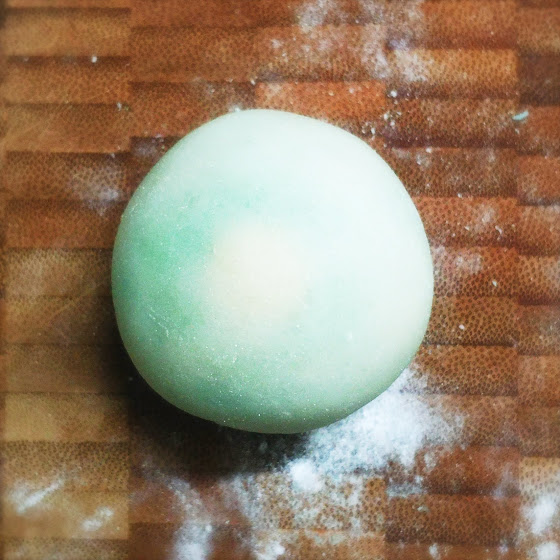
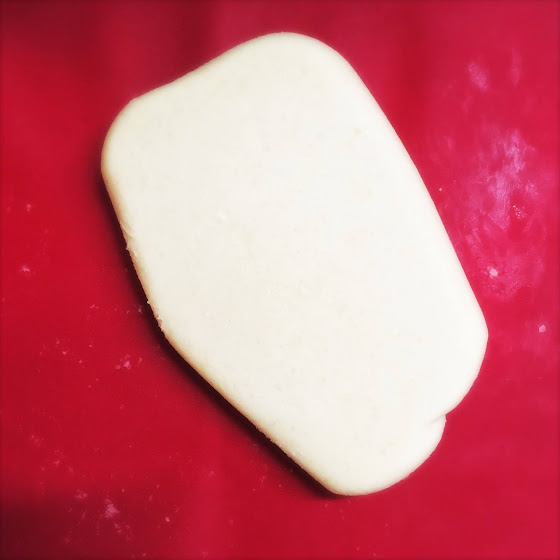
Here is the wrapped Nerikiri.  Look how pretty it is already!  The inner colored layer glows subtly through the outer white layer.  You can just see the blue, green and yellow colors.  It’s all ready for the final decoration stage!

Nerikiri,Flower,japanese,wagashi,Chrysanthemum,cake,White Bean Paste

The cleverest thing about these Nerikiri is the fact that they are so simply made.  Just humble bean paste and rice flour to make a dough.  And the shapes are all achieved with a few simple implements you can find in your house and the craftiness of your own two hands.  Amazing really.

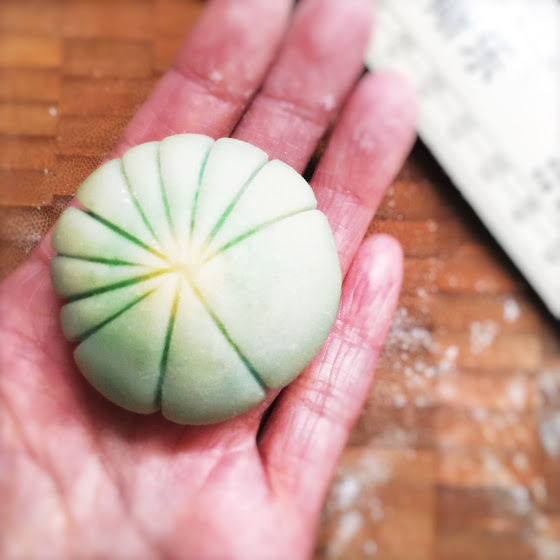
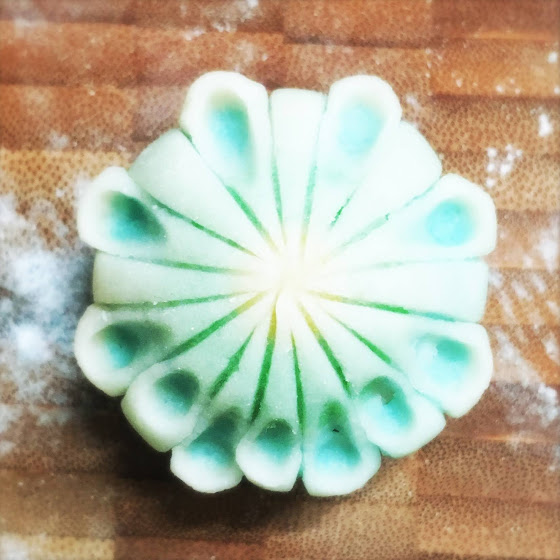
So onto the decorations.  We first craft some lines onto our Nerikiri.  Find something with a thin pointed edge.  I used a ruler edge.  Cradling the Nerikiri gently in one palm, use the ruler edge to make equally spaced lines all around, creating 16 sections.

See the lovely colors that show through the lines?  So clever, amirite?

Pssst…if you’re into gadgets there are Nerikiri tools that you can buy!  Check out a whole set of nerikiri tools here or just a wooden nerikiri edge tool here.

Nerikiri,Flower,japanese,wagashi,Chrysanthemum,cake,White Bean Paste
Now we make the petals.  For this I borrowed my little girl’s set of clay tools.  The little ball tool, also called a ball stylus, worked perfect to push the petals out.  Or you could just use something with a rounded end of the right size. 

As this decorating is rather tricky the first time or two, we’ve made a video showing the whole process in detail.  Do check it out, it’s easier if you can see it:

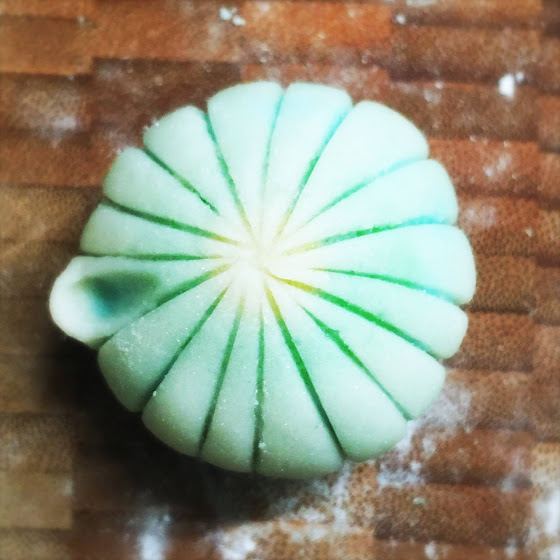
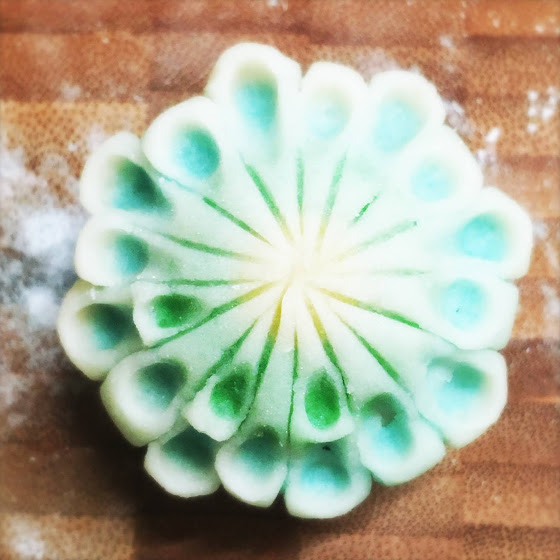
The ball tip size should be slightly smaller than the width of one section of your divided flower.  Carefully push down and out to form the petal.  The petal forms, a lovely blue petal edged in white.  We’ll call this the ‘outer layer’ of petals.  See how they extend slightly beyond the diameter of the wrapped cake.

Nerikiri,Flower,japanese,wagashi,Chrysanthemum,cake,White Bean Paste

Push out the ‘outer layer’ petals, one for every other section around the flower.

Nerikiri,Flower,japanese,wagashi,Chrysanthemum,cake,White Bean Paste

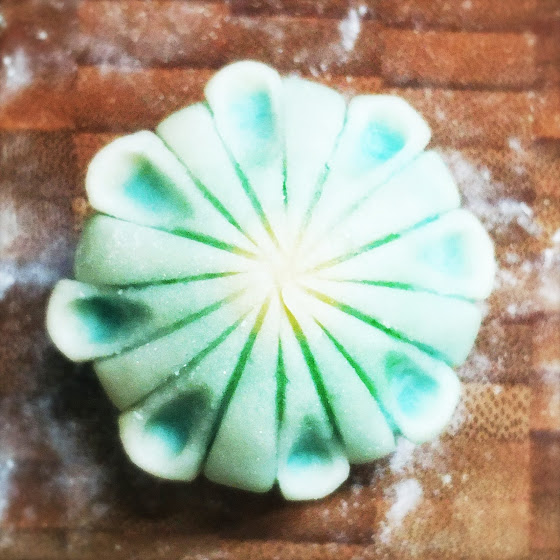
For the next round we’ll push out the ‘middle layer’ of petals.  These petals are made on the sections that were skipped over before and should end in a tighter circle than the first round.  I didn’t do that great of a job of that as you can see above but you get my meaning.  These petals should form a bit closer to the center.

Be sure that the ball tip you use is adjusted to be a bit smaller than the section bit that you’re pushing out.

Nerikiri,Flower,japanese,wagashi,Chrysanthemum,cake,White Bean Paste

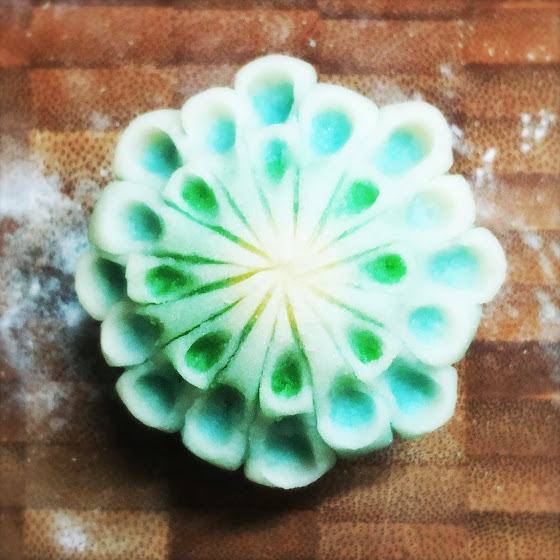
One more time around, this time we’ll make the ‘inner layer’.  The petal is pushed out on the same sections that the first ‘outer layer’ round of petals were made, only higher up.  So basically there are two petals pushed out on the same sections, one lower and one higher.  Again adjust with smaller ball tip to match the width of the section you’re working with.

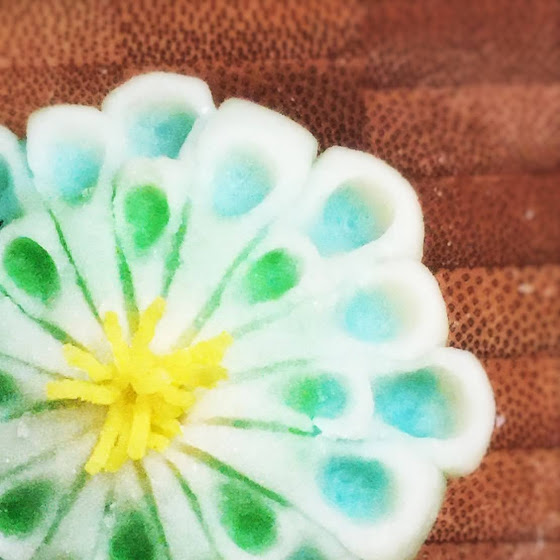
See how in this ‘inner layer’ the green color comes out?  So very clever, the Japanese, no?

Nerikiri,Flower,japanese,wagashi,Chrysanthemum,cake,White Bean Paste

Petals are done.  By this time your Nerikiri is probably out of shape a bit.  Use your hand to gently reshape the bottom of the cake to a pleasing shape.

Any time the wrapper dough becomes hard to work with just cover and set in fridge to chill and firm up a bit.

Nerikiri,Flower,japanese,wagashi,Chrysanthemum,cake,White Bean Paste

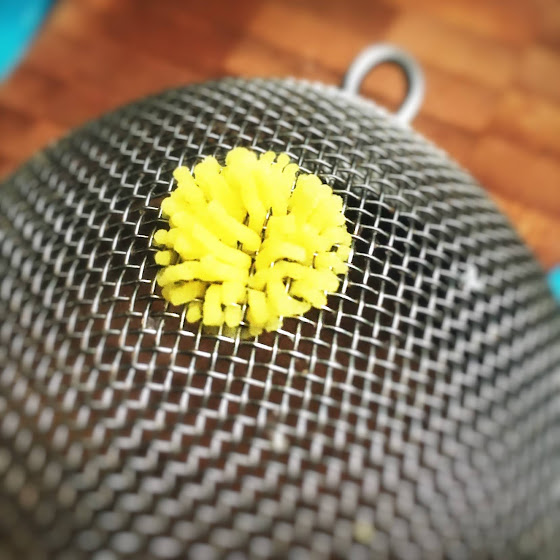
The final touch is absolutely brilliant.  The first time I saw someone do this I think I gasped, lol.  So effing clever!  Take the last bit of yellow colored dough that you have set aside and press it through a wire mesh strainer.  You have just formed delicate stamens for your chrysanthemum!  That’s right your handy dandy strainer that you use everyday has become your new pastry tool extraordinaire!

Making Nerikiri is so much fun.  It’s like being allowed to be a kid again and putter around with clay but way better cuz it’s so beautiful and you can eat it and it’s so yummilicious!  

Pssst…To see more incredible nerikiri check out Pink’s Wagashi Channel.  Incredible stuff that inspired this post!!  OMgosh, the lady is super talented.

Nerikiri,Flower,japanese,wagashi,Chrysanthemum,cake,White Bean Paste

Chrysanthemum White Bean Paste Cake Nerikiri Recipe

(makes 16 cakes)  Prep time: 10 mins   Decorating time: 20 mins

Ingredients:

Directions:

Prepare the filling:  Weigh out filling paste into 16 nos of 0.71oz/20g portions and roll into balls.  Cover and place in fridge to keep chilled.

Prepare the wrapper: Weigh out 16 nos 1.1oz/30g portions of dough. Take one portion and cover the rest to keep moist.  Further weigh this one portion into 4 portions as list below and roll into balls: 

  • 1 no. 0.53oz/15g ball
  • 1 no. 0.35oz/10g ball
  • 1 no. 0.07oz/2g ball
  • 1 no. 0.11oz/3g ball

Prepare the outer wrapper: Take the 0.53oz/15g ball and roll flat into 3 inch/7.6cm diameter circle.  Cover and put in fridge to keep chilled.

Prepare the inner wrapper:  Color the remaining three balls by kneading in gel food coloring.  The color order is as follows:

  • 0.35oz/10g ball shall be light blue 
  • 0.07oz/2g ball shall be light green
  • 0.11oz/3g ball shall be yellow

Set aside 2/3rds of the yellow dough for the ‘stamens’ and roll remaining yellow dough back into a ball.  Now roll out the colored balls as follows:

  • blue ball – 2.75 inch diameter circle
  • green ball – 3/4 inch diameter circle
  • yellow ball – 1/4 inch diameter circle

Center green circle on blue circle and press gently to attach.  Center yellow circle on green circle and press gently to attach.  Try not to stretch out the blue circle as you add on the other colors.  Inner wrapper is done.  Cover and chill for 10 mins.

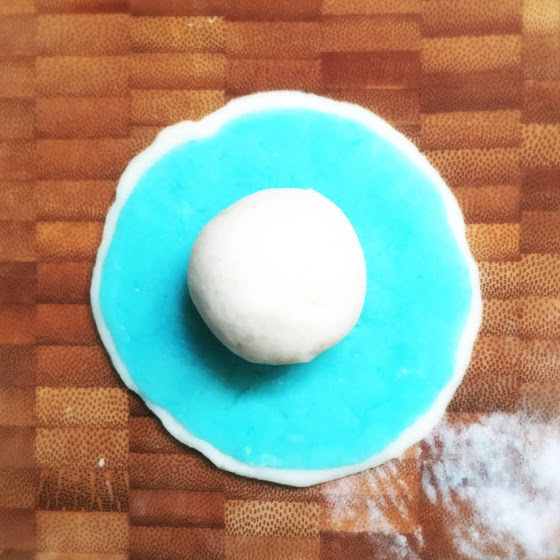
Combine outer and inner wrapper:  Place the inner wrapper, with green and yellow colors facing down, centered onto the outer wrapper.  Press lightly to attach.

Wrap the cake:  Place one filling ball centered onto the blue side of the wrapper.  Gather into palm and close the wrapper around the filling.  Use a ‘gather, turn, gather turn’ motion to pull the wrapper up and around the filling.  Close the opening and smooth.  

Roll the wrapped cake gently between palms to shape into a nice oval shape.  Cover and chill in fridge while making the rest of the cakes.

Decoration, adding lines:  Holding one cake at the edge of your palm, use the ruler’s edge to mark out 16 evenly spaced segment lines all around the oval.  

Please check out our little video to see the decorating method in more detail!

Decoration, making petals:  Next use the clay tool ball stylus (diameter of ball tip should be slightly smaller than the segment size) to push out an outer layer of petals on every other segment.  The petals should extend slightly beyond the nerikiri diameter.  The blue underneath is revealed in the petal.

Next, change the ball tip to match the segment size, and push out a middle layer of petals on the segments skipped before, again on every other segment, but with a tighter circumference than the outer layer.  The green underneath is revealed in these petals.

Last, push out an inner layer of petals.  These will be above the first outer layer of petals, again on every other petal.

Decoration, making stamens:  Press a shallow less than 1/4 inch hole into top center of nerikiri.  Take the reserved yellow dough.  Roll into a ball and push thru a strainer to form the flower stamens.  Use a knife to pick up the stamens and place onto the hole.  

Repeat until all nerikiri cakes are made.  Gorgeous chrysanthemum done – enjoy the autumn beauty!  

Storage: Keep covered in the fridge for up to three days.  

Bean-iliciousness at The Hong Kong Cookery:

Google


Source link

Visited 1 times, 1 visit(s) today

Related Article

Nothing Phone (3) hands-on – GSMArena.com news

Nothing has a new flagship phone – say hello to the Nothing Phone (3). The freshly announced Phone (3) arrives nearly two years after the Phone (2), and there are plenty of differentiating factors between the two. Let’s start with the back, since it’s always been a key area on Nothing devices. Phone (3) brings

Nothing’s ‘first true flagship’ phone plays it a little safe

“The Glyph interface is not a gimmick,” Nothing founder and CEO Carl Pei told the press as he revealed the Nothing Phone 3 for the first time, shortly before announcing that its new iteration lets you play Spin the Bottle on the back of the phone. It’s mixed messaging, but in Nothing’s defense, you couldn’t

What the End of COVID Mask Mandates Has Meant for Baristas

Though new strains of coronavirus are going around, most establishments have lifted mask mandates and aren’t planning to bring them back. Today, we explore how this has been impacting coffee workers. BY MELINA DEVONEYBARISTA MAGAZINE ONLINE Featured photo by Getty Images Lara* is a server at a busy high-end restaurant in Los Angeles. She continued

Nothing Phone (3) brings Glyph Matrix, Snapdragon 8s Gen 4 and 5,150mAh battery

The Nothing Phone (3) is one of the most anticipated phones of the year and it brings a bold redesign alongside several generational spec upgrades. The Glyph Interface has evolved into the Glyph Matrix – a monochrome LED display located at the top left corner of the phone’s back. Comprised of 489 individually lit

Realme GT 7 series first in line to get Android 16, followed by GT 6

In a short press release Realme promised to be among the first to deliver Android 16 to its flagship lineup. Of course, it’s no surprise that the GT 7 series will be the first phones from Realme’s portfolio to get the latest and greatest from Google. The Realme GT 7 Pro with Snapdragon 8 Elite,

Europe Mobile Phone Insurance Ecosystem Market 2025 Industry

Mobile Phone Insurance Ecosystem Market Introduction: The Mobile Phone Insurance Ecosystem Market is experiencing significant growth, fueled by the increasing sophistication and value of mobile devices, coupled with a heightened consumer awareness of potential risks. The market’s expansion is driven by several key factors, including the rising cost of smartphones, the increasing reliance on mobile

Google Pixel 10 Pro and Pixel 10 Pro XL’s specs surface

Google is expected to unveil the Pixel 10 series next month, and although the Mountain View-based internet search giant hasn’t divulged any details about the lineup yet, CAD-based renders that leaked in March revealed what the Pixel 10 series smartphones would look like. The same source has now shared specs of the Google Pixel 10

RedMagic Astra Gaming Tablet launches globally, starts from €469/$469

RedMagic’s Tablet 3 Pro launched in China last month, and it’s now ready to take on global markets. Now called the RedMagic Astra Gaming Tablet, this is every bit the compact tablet beast that its Chinese counterpart is. The tablet is built around a 9.06-inch display with uniform 4.9mm bezels. The panel is outstanding –

Baseus brings latest Enercore chargers and powerbanks with retractable USB-C cables

Originally announced back at CES, Baseus is now bringing its Enercore line of chargers and power banks globally. These come in several sizes with multiple ports, up to 100W charging speeds and max out at 20,000mAh capacities. They also share one common killer feature – retractable USB-C cables. Enercore CJ11 is the most compact offering

OnePlus Nord CE5 in for review

Today we are taking a look at the new OnePlus Nord CE5, the second phone launching next week alongside the Nord 5. We have already taken a look at the Nord 5 in a separate post and now it’s time to unbox the Nord CE5. For those unaware, the Nord series goes Nord > Nord

OnePlus Nord 5 in for review

Today we have with us the new OnePlus Nord 5, which is the latest mainline entry in the company’s affordable series of smartphones. The phone is set to launch next week alongside the Nord CE5 and today we can share a sneak peek at the device with an unboxing. Starting with the packaging, the Nord

iPhone 17 Pro series to get repositioned Apple logo

Apple may be looking to change more than the camera islands on its iPhone 17 Pro series as leakster Majin Bu is now confident that the Apple logo on the back is getting repositioned. The logo on the 17 Pro series would be positioned lower, and Apple is apparently also changing the placement of its

Oxford Spires Academy ditches smartphones for ‘brick’ phones

BBC Head teacher Louise Cowley took the decision to introduce a blanket ban over concerns smartphones were too disruptive A secondary school has banned smartphones for Year 7 to 11 pupils and will only allow basic “brick” phones from September. Oxford Spires Academy’s head teacher said the move would create a “calmer, more focused environment”.

vivo X Fold5’s India launch teased

vivo recently teased the launch of the X200 FE in India, and now the brand has announced the X Fold5 is “coming soon” to the country. vivo hasn’t revealed the launch date of the X Fold5 or the X200 FE in India, but we’ve learned from a reliable source that both smartphones will launch in

Infinix Xpad GT review – GSMArena.com tests

Introduction Last year Infinix launched the Xpad tablet with mid-range specs at an incredibly affordable price. This year, the slate is getting a more powerful big brother aimed at gaming and streaming – the Infinix Xpad GT. The Infinix Xpad GT brings a 13.0-inch LCD screen with 2,880 x 1,840 pixels, 10-bit color depth, 144Hz

0
Would love your thoughts, please comment.x
()
x